Monday, August 31, 2009

Trick or Treat Bags


I had lots of fun making trick or treat bags this weekend, can you tell? I dug through my craft closet and found some stuff I'd forgotten about (since it was way in the back under a pile of stuff it's easy to understand why) I started out making the witch feet for the girls and it spiraled from there! Knowing myself, if I didn't get these now, they'd get lost in the black hole that is my "to do" pile and the girls would be collecting candy with nekkid bags. I love the satisfaction with adding a big fat check next to a line on the to do list!

Megan is in love with her bag and wants it now. Actually, now that I think about it, she might be wanting the candy now, not necessarily the bag. Can't say I blame her there. Since I've only got two kids and have way more treat bags than that, go check out my Etsy shop. I'll be adding these there in the coming days.

One eyed, one horned, flying purple people eater (yes, that song goes through my head every time I look at this guy)

Taylor's purple witch feet. Her request was for purple stockings and flowers.

Jack 'O Lantern


Ghost


Thursday, August 27, 2009

Tip Junkie Trade Secrets


I love getting packages in the mail, so when I got an email from Tip Junkie about this swap that they are hosting, I was hooked! Fun, fun!

What it is is this: You make or purchase 3 things that you love and then mail it to your person by November 1st. The dollar limit is $25. The deadline to sign up is October 1st.

Easy, right?! I'm so looking forward to seeing what neat things come my way!

Come play along! (click on the button for the details on the Tip Junkie site)

Camera Strap!


I adore my camera! I have a Canon Digital Rebel XTi and it's fantastic (I have a 35mm Rebel that I love, too). I don't love the camera strap that came with it, though. I've seen those super cute camera straps on Etsy, but that darn cheap bone keeps me from buying them. I made one, but wasn't happy with the webbing on it (the part that attaches to the camera). I've searched and searched online and could only find tutorials for the sleeves that go over your existing camera strap. That's not what I want. Plus, I wanted minky on the inside (because it's oh, so soft!)


I got a tip from TankTop @2peas about what to use as the webbing, and it's perfect! So, I made two camera straps - one for me, and one as a gift. Now that I've got the how-to's figured out, I'm going to make some more (because a girl can never have too many!) and do a tutorial.


Watch for it (and the Mommy Necklace) coming soon!

Tuesday, August 25, 2009

Make Your Own Sewing Labels!

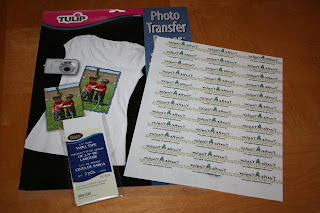
I bought my first batch of labels for the stuff I sew off of Etsy. Why? I'm too cheap (at this point) to pay to have woven labels made for Turtle Taylor, and I had no idea how to do it myself. So when it came time to re-order, my cheap bone kicked in and I did some research on the internet. I came across the most fabulous idea for making your own labels - Iron-on transfer paper! Seriously, it's a brilliant idea, but I don't remember where it came from (I need to start writing this down). Anywhoo, I learned a couple of very important things while I was making my own that I'm going to share. Ready?

Here's what you need:
  • twill tape (I wanted 100% cotton by the yard, but couldn't find any, so I had to get 100% polyester in a package)
  • Iron-On transfer paper made for computer printers (mine is by Tulip and came from the t-shirt decorating part of the craft store)
  • A computer and printer

Here's what you do:

  • Find the width of your twill tape, and figure out what length you'd like your labels to be.
  • In whatever program you like to use best, you'll need to arrange how you want your label to look. I used my Print Shop program, but Word would work, too. Make a table using the length and width dimensions for your labels. Once you've got the table set up, fill it in with your label text/logo.
  • Once you are happy with it (and checked for typos) print it out, following the directions on the package of your iron-on transfer paper. *IMPORTANT* If you want the label to look exactly like it does on your computer screen, you need to go to your printer settings and set it to print as a "mirror image" before you print. If you don't do this, everything will be backwards once you iron on the label.
  • Once it's printed out - be careful! The ink never fully dried on my transfer paper and smeared when I touched it (and I didn't realize that until I'd smeared several!)
  • Now, you need to cut apart each label image (be careful not to smudge)
  • Once you've got your images cut out, you'll need to cut your twill tape to the correct length. Don't forget to leave enough to fold under on each end so you'll have a nice, finished look when your label is sewn on.

  • Once you've got the individual labels cut from your twill tape, center your iron-on image on the tape and iron it on (follow package directions for this one)
  • Voila! Cheap, custom sewing labels.


OK, here are a couple of helpful hints:

  • I took the time to fold over each edge of my twill tape and iron it down, so I'd have labels that were totally ready to sew on. It was a complete waste of time because those little flaps were undone when I ironed-on my image. Don't waste your time, or do it after the image is ironed on!
  • Remember to set your printer settings to "mirror image" before you print, or your text will read backwards on your finished label.
  • If you are going to iron over the label when it's sewn on to something (or to iron the ends under), save the backer paper that you peeled off once the image was ironed on. Put that over the top of your label when you iron over it again and you'll prevent the iron from sticking to the image or mussing it up.
  • If you don't want sew on labels, just iron those puppies right on to your finished product!
  • The most time consuming part of this whole project was setting up the table so I could fill it in with my label info (and therefore print a sheet of labels in one shot). So, save often. It would stink to have that hard work go down in a blaze of glory!

Friday, August 21, 2009

Mommy Necklace

I'm going to be the craft person for my MOPS group this year, so I've been hunting down ideas for crafts that are cheap, easy and fantastic! This is one of them. I've been wanting a Mommy necklace for awhile now, but have been way too cheap to buy one. So, I made it myself!

It's made out of washers from the Home Depot (cool and cheap all wrapped into one) that I stamped with my girls names. I put them together with wire from my scrapbooking stash because I found the cute angel charm that I wanted to put with them. If I didn't want to use the charm, I probably would have just run the ball chain through the holes of the washers.

Guess what the grandmas are going to get for Christmas?


Tuesday, August 18, 2009

Redesign - Hall Table

Another post with yucky photos. Yippee! I tried to get better photos, really I did. Three times I took photos and edited, and they were all about the same. This table is located in my hallway and there aren't any windows that are super close. Add that to the fact that we've got the typical, small hall light and sunscreens on our windows (which is an absolute necessity here) and you've got a recipe for poor photos (even with my big flash). Alas, I tried. You'll still get the idea, though!

So, I've been wanting to do small updates around here (though hubby and I differ on what would constitute "small"), so this is one of the simple updates I started with. This table gets largely ignored - because it's in the hall. What was on the table worked, but not well.

The before:


The after:


The after is just some small, simple changes. We've got tall ceilings here and there is a large barn star hanging above this table. So, the items that were on it before were a little small in scale for that large star (you can see part of the star in the last photo). This new grouping is much better in scale.

The only thing I didn't have in my house prior to this weekend was the lamp. Everything else came from somewhere within my house. That came from a model home sale I went to this weekend. I'd seen signs for them before, but had never stopped. I didn't know what I was missing! Anyway, the lamp I bought for the living room but didn't like it once I got it in there. It works great in the hallway, however! Since the lamp is so tall, I needed something tall to balance it out. So, down came the chicken from atop my laundry room cabinets. A small, gold photo frame from my bedroom and two hardcover books to elevate the other frame and I was done!


The end result is much better and doesn't make the table look as if it were an afterthought. I've wanted to put a different piece of furniture in this niche for awhile (like maybe a small armoire), but I've not been able to find the right piece. I had it in my mind that this would make a cute potting bench for my garden. Now that I've updated the accessories on the table, I'm liking it so much more. If the table ends up sticking around, I think I might finally give it a new coat of paint.


(Want to know a little secret? There is no electrical outlet anywhere near this table, so the lamp is purely decorative. One day I'll get an electrician out here to fix that! In the meantime, the lamp will just have to look fabulous off) :)

Friday, August 14, 2009

Giveaway!


A while back I told you that I'd partnered with a couple of fantastic sites for giveaways, and the first one is here!

When Susana at Our Homeschool Fun contacted me and asked me if I'd sponsor a giveaway on her site, I was intrigued. I've been toying with the idea of homeschooling our girls for a couple of months now, so it was another push from the cosmos in that direction, it seemed. When I visited her site, I fell in love. First, she's got super adorable kiddos! Seriously, wait until you see the pictures of them. Cuteness overload. Second, the stuff she does with her kids looks like so much fun!

So, go pay her a visit and enter to win a chance to win an Owl print crayon wallet handmade by Moi! You can see all the contest details here. I just checked out the comments and got warm fuzzies. *Smooch* to all of you for the love!

I'm still weighing my options regarding schooling, but I'm now following her site because of all the super cute ideas she's got. I can't wait to try some of the crafts she's got. Her recipe for banana bars is something the girls and I are going to make this week. Yummy!