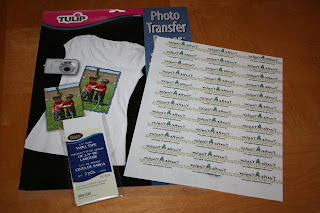
 Here's what you need:
- twill tape (I wanted 100% cotton by the yard, but couldn't find any, so I had to get 100% polyester in a package)
- Iron-On transfer paper made for computer printers (mine is by Tulip and came from the t-shirt decorating part of the craft store)
- A computer and printer
Here's what you do:
- Find the width of your twill tape, and figure out what length you'd like your labels to be.
- In whatever program you like to use best, you'll need to arrange how you want your label to look. I used my Print Shop program, but Word would work, too. Make a table using the length and width dimensions for your labels. Once you've got the table set up, fill it in with your label text/logo.
- Once you are happy with it (and checked for typos) print it out, following the directions on the package of your iron-on transfer paper. *IMPORTANT* If you want the label to look exactly like it does on your computer screen, you need to go to your printer settings and set it to print as a "mirror image" before you print. If you don't do this, everything will be backwards once you iron on the label.
- Once it's printed out - be careful! The ink never fully dried on my transfer paper and smeared when I touched it (and I didn't realize that until I'd smeared several!)
- Now, you need to cut apart each label image (be careful not to smudge)
- Once you've got your images cut out, you'll need to cut your twill tape to the correct length. Don't forget to leave enough to fold under on each end so you'll have a nice, finished look when your label is sewn on.
- Once you've got the individual labels cut from your twill tape, center your iron-on image on the tape and iron it on (follow package directions for this one)
- Voila! Cheap, custom sewing labels.

OK, here are a couple of helpful hints:
- I took the time to fold over each edge of my twill tape and iron it down, so I'd have labels that were totally ready to sew on. It was a complete waste of time because those little flaps were undone when I ironed-on my image. Don't waste your time, or do it after the image is ironed on!
- Remember to set your printer settings to "mirror image" before you print, or your text will read backwards on your finished label.
- If you are going to iron over the label when it's sewn on to something (or to iron the ends under), save the backer paper that you peeled off once the image was ironed on. Put that over the top of your label when you iron over it again and you'll prevent the iron from sticking to the image or mussing it up.
- If you don't want sew on labels, just iron those puppies right on to your finished product!
- The most time consuming part of this whole project was setting up the table so I could fill it in with my label info (and therefore print a sheet of labels in one shot). So, save often. It would stink to have that hard work go down in a blaze of glory!


8 comments:
Thanks so much for sharing this helpful post--especially the added tips!
Genius I LOVE it! I have wanted some for years but also am too cheap...BTW I love your name!
did you say this? before printing....make sure they are reversed or mirrored. I hate it when i forget and mess up a whole sheet of that stuff!! uggh. great tute.
Whosies - Great catch! I'll update with that little tidbit!
Could you iron on the labels to the twill tape before cutting them out, Instead of cutting out the twill tape then ironing? That way you would have it in a roll? Haven't tried it yet; but just wondering if it would be easier or save time.
Gigi, I bet you could do that, no problem. It might be hard to get the labels ironed on the same distance apart, so the labels might vary in size a bit, but otherwise, I don't see why it wouldn't work.
You are a money saver!!!!!!
Wow what a great idea - and definitely within any reasonable budget! Any thoughts about how to do washing instruction tags?
Post a Comment