Showing posts with label sewing. Show all posts

Monday, June 6, 2011

Quick and Easy T-Shirt Embellisment Tutorial

It's the first week of summer vacation here and that means Vacation Bible School! We always get a t-shirt as part of our VBS. They're cute, but plain. Because I'm one of those annoying people that can't leave things plain, I always jazz them up a bit. They turned out really cute, and I'm considering making one with a plain tee for myself. Plus, it was quick and easy (it took about 20 minutes per shirt!) Here's how I made this year's version:

Supplies:
t-shirt
scissors
fabric scraps that are long enough to go around the front neckline of your shirt (I used a white muslin)
rotary cutter and mat (optional)
sewing machine
beads (optional)
needle and thread (optional)


First, take your scissors and cut off the neck of the t-shirt. You'll end up with something that looks like this:


I cut 1/2" strips of my muslin and pinned them around the neck of the shirt. I started and stopped each muslin strip at the shoulder seam. Then, I sewed straight down the middle of each strip. I did a total of 3 strips around the neckline. (I have a thing for odd numbers)


Once I had the strips sewn on, I added some beads. I sewed these on by hand. I did a total of three groups of beads. One between the first and second strip on the left side, one between the first and second strip on the right side and one between the second and third strip smack in the center. Here's a close up that shows the beads:


Once I was done with the neckline, I decided to use my scraps and do the sleeves, too. (Seriously, I can't leave well enough alone!) So, I folded the edges of the sleeves up one time (so the underside showed) and sewed my fabric strip right over the top of the stitching.


There you have it: a quick and easy way to dress up a t-shirt!

Wednesday, September 30, 2009

Pumpkin Pillows!

Last year at one of my favorite home decor boutiques I bought the most adorable pumpkin pillow. I loved it! This year, I wanted more than the one, but the $25 price tag (for the small one) stopped me short! Mine turned out just as cute, and I did the whole bunch for about $15.

What you need:
  • Fabric for the body of the pumpkin - I used home decor fabric remnants that I got for super cheap at the fabric and craft store. I used a half yard cut for the largest pumpkin, the smallest was about a quarter yard.
  • Fabric for the pumpkin stem - small scraps work great for this
  • Fiber-fill
  • Fabric scraps for bean bag - color doesn't matter
  • Rice or beans - for the bean bag
  • Coordinating fabric or ribbon for the bows around the stem

Here's what you do:

  • Cut two squares out of your body fabric roughly the size you'll want your finished pillow to be. The sides don't have to be straight, so just make a rough square shape.
  • To create the pleat, find the center of your square by folding it in half and marking it with a straight pin. Now, make an accordion fold on the left side, making sure the folded edge hits your center. Pin in place.


  • Do the same on the right side. You'll end up with something that looks like this:

  • Stitch over the pleat to hold it in place. Repeat the process on the second square of body fabric. Set aside.

  • Out of a coordinating fabric, create your stem. I cut my stems approximately 3" wide by 4" long. With the right sides together, sew around three sides of the stem, leaving the bottom open.

  • Turn the stem right side out and stuff with fiber-fill.
  • Take one square of your body fabric and place it on your work area, right side up. Pin your stem to the body fabric and then place the second body piece and place it on top (right sides together). Pin in place.

  • Leaving an opening at the bottom, sew the 3 pieces together. Stitch in a rough pumpkin (oval or circular shape). You'll have something that looks like this:

  • Trim the excess fabric:

  • Turn your pumpkin right side out. Stuff with fiber-fill and set aside.
  • To help the pumpkins stand, you'll need to create a bean bag. Taking your fabric scraps, cut a rectangle or a square that is slightly smaller than the length of your finished pumpkin. Leaving an opening to fill it, sew around the edges.

  • Fill with rice or beans and then sew the opening shut.
  • Place bean bag inside the pumpkin and hand stitch the opening shut.
  • For the bows around the stems I took a length of fabric about 3" wide and sewed down the long end. Once sewn, I turned it inside out and then sewed the two ends closed, making a long ribbon out of the fabric. Of course, a cute ribbon would work just as well!

Enjoy creating your very own pumpkin patch!

Tuesday, August 25, 2009

Make Your Own Sewing Labels!

I bought my first batch of labels for the stuff I sew off of Etsy. Why? I'm too cheap (at this point) to pay to have woven labels made for Turtle Taylor, and I had no idea how to do it myself. So when it came time to re-order, my cheap bone kicked in and I did some research on the internet. I came across the most fabulous idea for making your own labels - Iron-on transfer paper! Seriously, it's a brilliant idea, but I don't remember where it came from (I need to start writing this down). Anywhoo, I learned a couple of very important things while I was making my own that I'm going to share. Ready?

Here's what you need:
  • twill tape (I wanted 100% cotton by the yard, but couldn't find any, so I had to get 100% polyester in a package)
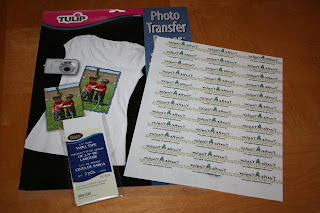
  • Iron-On transfer paper made for computer printers (mine is by Tulip and came from the t-shirt decorating part of the craft store)
  • A computer and printer

Here's what you do:

  • Find the width of your twill tape, and figure out what length you'd like your labels to be.
  • In whatever program you like to use best, you'll need to arrange how you want your label to look. I used my Print Shop program, but Word would work, too. Make a table using the length and width dimensions for your labels. Once you've got the table set up, fill it in with your label text/logo.
  • Once you are happy with it (and checked for typos) print it out, following the directions on the package of your iron-on transfer paper. *IMPORTANT* If you want the label to look exactly like it does on your computer screen, you need to go to your printer settings and set it to print as a "mirror image" before you print. If you don't do this, everything will be backwards once you iron on the label.
  • Once it's printed out - be careful! The ink never fully dried on my transfer paper and smeared when I touched it (and I didn't realize that until I'd smeared several!)
  • Now, you need to cut apart each label image (be careful not to smudge)
  • Once you've got your images cut out, you'll need to cut your twill tape to the correct length. Don't forget to leave enough to fold under on each end so you'll have a nice, finished look when your label is sewn on.

  • Once you've got the individual labels cut from your twill tape, center your iron-on image on the tape and iron it on (follow package directions for this one)
  • Voila! Cheap, custom sewing labels.


OK, here are a couple of helpful hints:

  • I took the time to fold over each edge of my twill tape and iron it down, so I'd have labels that were totally ready to sew on. It was a complete waste of time because those little flaps were undone when I ironed-on my image. Don't waste your time, or do it after the image is ironed on!
  • Remember to set your printer settings to "mirror image" before you print, or your text will read backwards on your finished label.
  • If you are going to iron over the label when it's sewn on to something (or to iron the ends under), save the backer paper that you peeled off once the image was ironed on. Put that over the top of your label when you iron over it again and you'll prevent the iron from sticking to the image or mussing it up.
  • If you don't want sew on labels, just iron those puppies right on to your finished product!
  • The most time consuming part of this whole project was setting up the table so I could fill it in with my label info (and therefore print a sheet of labels in one shot). So, save often. It would stink to have that hard work go down in a blaze of glory!

Monday, July 13, 2009

Super Cute Onesie!

A long time ago, I bought a package of plain white onesies, intending on making something cute out of them to add to my pile of goodies that I take to craft shows. It's now years later (seriously, years!) and I was cleaning out my craft closet and came across the onesies. I found out about a gathering foot for my sewing machine on a sewing blog I stumbled across (and can't remember what it is!), so off to Joann's I went thinking this package of onesies would be perfect to try it out on.

I get my gathering foot home and attach it to my machine. I'm thinking that it will "ruffle" the fabric as I sew it. That didn't happen. It just created a stitch down the middle of the fabric strip. Hmmm. Not what I thought I'd get when I read about it and read the instructions that came with the foot. I tugged on one of the threads and it created a gather, so I just went with that. I'm thinking a trip to Joann's is in my near future so I can get one of the gals in the sewing machine department to demonstrate how this foot is actually supposed to work, because I'm fairly certain I didn't do something right (not like that would be a first, or anything!).
Now that I've got my cute ruffles in red and white polka dots and black and white polka dots, I sewed them to the fanny of the onesie. Cute!
The front was obviously too plain and I debated about doing an applique on this one, but decided a bit of bling was in order. So, I used my Minnie Mouse pattern that I used for the T-shirts I made for our Disneyland trip for a cute rhinestone Minnie design.
I think this turned out so cute! Makes me (almost) wish I had one small enough to fit into onesies again! Hubby won't go for that, so maybe I can just finagle another Disneyland trip out of him, instead. Wishful thinking and all that. :)


Since I've still got a handful of onesies left, I'm going to keep experimenting with my gathering foot and see what else I can come up with. I think I will try an applique on the next one. Maybe I'll go for broke and do an applique with rhinestones!


Monday, May 18, 2009

Crayon Caddy Part 2


I made a handful of these and posted about them awhile back. I quickly realized that using a tie to hold them closed was no good. Why, you ask? Because I have two little girls and only one has acquired the skill of tying bows (and this is a fairly recent accomplishment).

Since I am the designated shoe tier, I decided that I needed to revamp my crayon holders a bit.. I'm pretty happy with this new version made from a pattern I purchased on Etsy. So happy that I made seven last week! I've got to get a jump on inventory for fall craft shows and my Etsy store. Look for them in my store soon!


Tuesday, April 21, 2009

Megan's New Favorite Blanket

A couple of months ago I posted about the quilt that I had made for Taylor to replace the lovie she'd left at a hotel. While I was making hers, I came across this fabric that just screamed Megan to me, so I made her one, too. See, ladybugs were on the bag that they gave me at the hospital just after I had Megan, so I always associate ladybugs with her. Plus, the blue and the red were just too cute and cheerful!

I cut out a large heart to stitch on the front with a big letter "M" made out of Minky, so she'll always know how much I love Megan! The front is all cotton quilt fabric, the back is red Minky fabric that is so soft and cuddly!


Saturday, April 18, 2009

Cupcake Party Goodie Bags


I'm knee deep in cupcakes here! These are the bags I made to hold the party favors for Megan's birthday party. I made them in several different colors (light pink, dark pink, fuchsia, green, blue, orange and purple) so that everyone could pick their favorite colors. They are made out of felt and have rhinestone sprinkles and a button cherry on top. I'll post again soon with the goodies that are going into these yummy bags.


I've got them listed in my Etsty store, too!


Monday, February 23, 2009

Taylor's (new) Favorite Blanket


Taylor had this fleece blanket that she called her "favorite blanket". It wasn't anything special, just this fleece square that looked off white, but if you looked closely, it was really a pale blue checked print. It held no special meaning - she wasn't wrapped up in it as a baby, it wasn't a gift from anyone (it was actually left behind at our 1st house and we never figured out who had left it), it was just a fleece blanket that became quite loved.

Until, that is, our trip to The Polar Express this year. Favorite blanket was packed for the overnight trip and made it into the car. I think it may have even made it into the hotel. Where it is now, I have no idea. I don't know if it got left behind in the hotel room (even though I checked the room before we checked out and calls to housekeeping turned up nothing), or if it fell out of the car during one of our pit stops, or if Taylor took it with her into a restaurant and it got left behind. At any rate, favorite blanket didn't make it home from that trip.
To ease the sting a little, I took Taylor to the quilt store with the promise that she could pick out the fabric she liked and I'd make her a new favorite blanket. She's loving the purple right now, so that's what she went with. I got the idea for adding the initial from a friend who also makes quilts, and I think it's adorable! I used my Cricut machine to cut out a heart and the letter "T" that I used for templates. The front is cotton quilt fabric, the letter "T" and the backing is made our of Minky fabric. It didn't take me more than 2 hours, and now she's got a new blanket to love!


Thursday, November 20, 2008

The Crayon Caddy


My sister asked me if I could make one of these, so here it is. Most of the crayon holders I've seen just hold crayons, but I thought it would be more useful if it held paper, too. So, I adapted the patterns for the crayon only holder and came up with this. Each one holds 12 crayons and a refillable pad of paper. They roll up and tie closed so they can be put in a backpack, purse or diaper bag. Cute way to take a craft on the go!
My next batch I'll have to fancy up a bit for my two fancy girls. They are each getting one in their stocking!

Aren't they fabulous?!


I've caught the green cleaning bug and now I've got a new cleaning obsession - the show "How Clean is your House?" The show is on BBC America and comes on a couple of times a day. If you haven't watched it before, I'll warn you now. You'll be blown away that people actually live in that filth. You will gag. You might even throw up a bit in your mouth. Even so, I love this show! First, there's those fabulous British accents. Second, the ladies that host the show (Kim and Agie) are a hoot. Thirdly, they have fantastic cleaning tips (did you know that sour milk will make brass shine?). But the best part of the show are the gloves! They never clean a house without wearing the most fabulous rubber gloves.

Since I decided that I had to have some and am way too cheap to buy them, I made my own. They turned out quite fabulous, if I do say so myself. Now, it's time to get cleaning!