


Friday, October 23, 2009
Giveaway time!
I know, I know. I haven't been here in awhile. I've been in a bit of a funk. I haven't been crafting much and haven't had much to say (hubby is stunned with that last one, I must say!). But, I'm back and have super fantastic news! I've teamed up with The Creative Junkie for a giveaway! If you haven't visited her blog before, you're in for a treat! You'll love her blog, I promise! Best of all, you can ENTER for a chance to win $25 worth of goodies from the Etsy store of yours truly!
Wednesday, September 30, 2009
Pumpkin Pillows!
 Last year at one of my favorite home decor boutiques I bought the most adorable pumpkin pillow. I loved it! This year, I wanted more than the one, but the $25 price tag (for the small one) stopped me short! Mine turned out just as cute, and I did the whole bunch for about $15.
What you need:
- Fabric for the body of the pumpkin - I used home decor fabric remnants that I got for super cheap at the fabric and craft store. I used a half yard cut for the largest pumpkin, the smallest was about a quarter yard.
- Fabric for the pumpkin stem - small scraps work great for this
- Fiber-fill
- Fabric scraps for bean bag - color doesn't matter
- Rice or beans - for the bean bag
- Coordinating fabric or ribbon for the bows around the stem
Here's what you do:
- Cut two squares out of your body fabric roughly the size you'll want your finished pillow to be. The sides don't have to be straight, so just make a rough square shape.
- To create the pleat, find the center of your square by folding it in half and marking it with a straight pin. Now, make an accordion fold on the left side, making sure the folded edge hits your center. Pin in place.

- Do the same on the right side. You'll end up with something that looks like this:

- Stitch over the pleat to hold it in place. Repeat the process on the second square of body fabric. Set aside.

- Out of a coordinating fabric, create your stem. I cut my stems approximately 3" wide by 4" long. With the right sides together, sew around three sides of the stem, leaving the bottom open.

- Turn the stem right side out and stuff with fiber-fill.
- Take one square of your body fabric and place it on your work area, right side up. Pin your stem to the body fabric and then place the second body piece and place it on top (right sides together). Pin in place.

- Leaving an opening at the bottom, sew the 3 pieces together. Stitch in a rough pumpkin (oval or circular shape). You'll have something that looks like this:

- Trim the excess fabric:

- Turn your pumpkin right side out. Stuff with fiber-fill and set aside.
- To help the pumpkins stand, you'll need to create a bean bag. Taking your fabric scraps, cut a rectangle or a square that is slightly smaller than the length of your finished pumpkin. Leaving an opening to fill it, sew around the edges.

- Fill with rice or beans and then sew the opening shut.
- Place bean bag inside the pumpkin and hand stitch the opening shut.
- For the bows around the stems I took a length of fabric about 3" wide and sewed down the long end. Once sewn, I turned it inside out and then sewed the two ends closed, making a long ribbon out of the fabric. Of course, a cute ribbon would work just as well!
Enjoy creating your very own pumpkin patch!

Monday, September 28, 2009
Potty Prizes!
 We've been potty training again, which is why I've been noticeably absent from the blog lately. Potty training has been consuming a lot of my time. OK, maybe it's not all potty training, but the moping of the floors (yup, we've had accidents - thank goodness for tile!) and the inevitable loads of laundry that goes with the potty training. Thankfully, it looks like we've got the hang of it and that it's going to stick!
I freely admit that I bribe her to potty on the potty. I figure it's a short term loss, long term gain thing. Plus, a little sugar is a fantastic motivator! Pixy Stix are a favorite of hers, but carrying them in my purse doesn't work (purse full of sugar powder, anyone?). I had a stroke of genius at the Dollar Store the other day (oh, how I love you Dollar Tree!).
This little plastic pencil case is the perfect Pixy Stix holder! It's rigid enough that they won't get bent and broken in my purse, it's the right size, and it's light enough that it doesn't add too much weight to my already stuffed purse.
Perfect for our potty prizes on the go!

Tuesday, September 22, 2009
Yummy Cheese Soup!
 It's officially fall! Even though we've still got a couple of weeks here before it'll finally start to cool off a bit, I figured I'd post one of my very favorite soup recipes in the hopes that I'll be in the mood to make it here soon!
Easy Cheddar Cheese Soup
1/4 cup butter
1 onion, chopped
1/4 cup all purpose flour
3 cups chicken broth
3 cups milk
1 pound shredded Cheddar Cheese
Fresh Broccoli, chopped (optional, about 2 cups worth)
1/2 cup shredded carrots (optional)
In a large saucepan, melt butter over medium high heat. Add onion and cook until tender (about 5 minutes). Stir in flour and cook until the flower and the onion mixture are thoroughly blended.
Add chicken broth and cook, stirring constantly until mixture thickens slightly. Add milk, broccoli and carrots (if used) and heat just to boiling, stirring constantly. Reduce heat to low and stir in cheese. Once cheese is melted, remove from heat.
It's such a yummy soup recipe, and really easy, too! It's good as just a cheese soup, but I like it best with the broccoli and carrots. Enjoy!

Friday, September 11, 2009
A Birthday Present

This birthday present was inspired by a post I saw in the gallery at 2 peas. I love it, so I had to try my hand at it!
 I bought the frame at the model home sale I went to a couple of weeks ago (loved it!) with the intention of using it for this project. I cut a piece of scrapbook paper to fit inside the mat. I made a heart template out of a piece of cardstock and then positioned it on the paper and traced around it with a fine point felt tip pen.
The chipboard dots and jewels are "Rock On Chip Plates" from Prima (they came from the craft store). They are self adhesive, so I just started sticking them down to fill in the heart outline. I added a couple of yellow buttons, too.

Once the heart was filled in, I stamped the name and est. date on a scrap piece of cardstock, added a bit of trim and popped it into the frame.
I'm wishing I bought enough to make one for me now!
Tuesday, September 8, 2009
Cricut and Today's Mama Great Escape Meme Contest
Do you have a Cricut machine and love it (and want more cartridges)? Do you want one for your very own? If so, this is the contest for you!
I have a Cricut machine and use it for lots of things. I'm seriously in love with the thing! I use it for paper crafting, scrapbooking, homeschooling, sewing, decorating - you get the idea. Today's Mama has teamed up with the folks at Cricut again and are giving away a choice of fantastic prizes - either a Cricut machine or all 4 of the new cartridges. How's that for a prize!? You can see all of the details here on the Today's Mama site or go check out the Cricut site here. Basically, to enter, you copy and paste the Great Escape Meme from the link above, create a blog post about it and then send an email to the folks at Today's Mama with a link to it. Easy, peasy.
Here goes:
Great Escape Meme
This is a contest entry for those crazy folks at TodaysMama and Cricut. Be sure to check out Cricut's cool new cartridges and the chance at $30,000 in travel for you and your friends at the Great Gypsy Escape site!
1. If you could escape to anywhere in the world where would it be?
I'd head to the UK. I love England and have always wanted to go to Scotland, Wales and Ireland. I'd love to spend about a month exploring!
2. What song do you play when you are by yourself in the car?
Viva La Vida by Coldplay and Cowboy by Kid Rock are my favorites!
3. If you had a night to yourself, and money was no object, what would you do?
I'm easy - I'd go to the movies and see a chick flick. (the 8 or so movies I saw in the theatre were rated "G")
4. What is your guilty pleasure?
Fountain soda and quilt fabric. I can't get enough of either!
5. What is the farthest place you have traveled away from your home?
Europe
6. Last book that you couldn't put down?
Agnes and the Hitman by Jennifer Cruise and Bob Mayer. It's not a literary classic, but it is a
fun and entertaining read!
7. When you want to escape into another time, what movie do you watch?
I really enjoyed The Other Boleyn Girl and The Duchess. Fantastic sets and costumes!
8. What is your favorite local escape?
We are loving the community pool just down the road that is like a mini water park! It's great
fun and we can all get in to play all day for less than $5!
9. How do you escape on a budget?
We stay at places that have a mini fridge and bring our breakfast and lunch stuff (like bagels
and sandwich fixings) and snacks. Doing this vs eating out saves us a bunch!
10. Best food you've ever had while on vacation.
Hands down, Paella in Spain. I ate it for practically every meal when I was there and have yet
to find any in the States that tastes as good!
So, there you go. If you decide to play along, leave a comment with a linky. I'd love to read yours!
Thursday, September 3, 2009
I love coupons!
Shopping with coupons is so much fun! No, really - it is! I got a coupon high after grocery shopping today, so I figured I'd share!
I used to do the Grocery Game, but then I figured it was silly to spend money on a program that's supposed to save money, so now I do it all myself. On Wednesday when the new grocery ads come out I sit down with them and my coupon binder and make my shopping list. I have a pretty good idea of what's a great sale price for most items, so that helps a bunch.
This week I spent the bulk of my shopping money at Fry's. They are doing quadruple coupons (up to $0.25, so that coupon for $0.25 off is now worth $1.00) and they are accepting store coupons from other stores. That's a great thing! Today, I got a cart full of groceries and my total before sale prices and coupons was $121.40. What I actually paid was $43.26, so I had a savings of $78.14 after sales and coupons. That's 65%! For our family of four, I usually spend about $150 every two weeks. That includes everything - food for breakfast, lunch, dinner and snacks, cleaning stuff and health and beauty stuff.
When something is cheap, I buy a bunch of it so it will last us until it goes on sale for super cheap again. This obviously requires lots of storage space. I'm pretty lucky in that I've got a really big pantry, a big laundry room where I've got an extra fridge and a freezer in the garage!
Here's what my pantry looks like:
 It's big and I love it! I've got everything in here from food, extra health and beauty stuff (in the baskets) and big kitchen gadgets. It's pretty well organized (most of the time anyway!). I make sure to rotate my stuff when I go shopping, so I've never got old stuff hanging out in my pantry. FIFO - first in, first out.
 I have a love/hate relationship with my coupon binder. I love it when I'm shopping and see my total going down on the register, but when it's time to clip the coupons and file it away, I hate it.
My binder is pretty well trashed, so it's time for a new one. I'm thinking this time around I'll make it pretty with my scrapbook supplies.

The inside is filled with trading card and photo pages that came from Wal-Mart. The trading card pages are for the small coupons, the photo pages are for the enormous ones!
 Want to learn more about shopping with coupons (and not have to subscribe to a paid service)? Check out Hot Coupon World. Tons of info there!
Monday, August 31, 2009
Trick or Treat Bags

I had lots of fun making trick or treat bags this weekend, can you tell? I dug through my craft closet and found some stuff I'd forgotten about (since it was way in the back under a pile of stuff it's easy to understand why) I started out making the witch feet for the girls and it spiraled from there! Knowing myself, if I didn't get these now, they'd get lost in the black hole that is my "to do" pile and the girls would be collecting candy with nekkid bags. I love the satisfaction with adding a big fat check next to a line on the to do list!
Megan is in love with her bag and wants it now. Actually, now that I think about it, she might be wanting the candy now, not necessarily the bag. Can't say I blame her there. Since I've only got two kids and have way more treat bags than that, go check out my Etsy shop. I'll be adding these there in the coming days.
 One eyed, one horned, flying purple people eater (yes, that song goes through my head every time I look at this guy)
Taylor's purple witch feet. Her request was for purple stockings and flowers.

Jack 'O Lantern

Ghost

Ghost
Thursday, August 27, 2009
Tip Junkie Trade Secrets

I love getting packages in the mail, so when I got an email from Tip Junkie about this swap that they are hosting, I was hooked! Fun, fun!
What it is is this: You make or purchase 3 things that you love and then mail it to your person by November 1st. The dollar limit is $25. The deadline to sign up is October 1st.
Easy, right?! I'm so looking forward to seeing what neat things come my way!
Come play along! (click on the button for the details on the Tip Junkie site)
Camera Strap!

I adore my camera! I have a Canon Digital Rebel XTi and it's fantastic (I have a 35mm Rebel that I love, too). I don't love the camera strap that came with it, though. I've seen those super cute camera straps on Etsy, but that darn cheap bone keeps me from buying them. I made one, but wasn't happy with the webbing on it (the part that attaches to the camera). I've searched and searched online and could only find tutorials for the sleeves that go over your existing camera strap. That's not what I want. Plus, I wanted minky on the inside (because it's oh, so soft!)
I got a tip from TankTop @2peas about what to use as the webbing, and it's perfect! So, I made two camera straps - one for me, and one as a gift. Now that I've got the how-to's figured out, I'm going to make some more (because a girl can never have too many!) and do a tutorial.
Watch for it (and the Mommy Necklace) coming soon!
Tuesday, August 25, 2009
Make Your Own Sewing Labels!
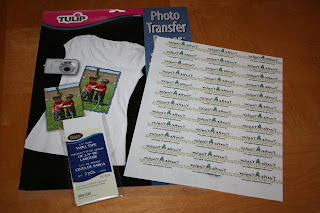
I bought my first batch of labels for the stuff I sew off of Etsy. Why? I'm too cheap (at this point) to pay to have woven labels made for Turtle Taylor, and I had no idea how to do it myself. So when it came time to re-order, my cheap bone kicked in and I did some research on the internet. I came across the most fabulous idea for making your own labels - Iron-on transfer paper! Seriously, it's a brilliant idea, but I don't remember where it came from (I need to start writing this down). Anywhoo, I learned a couple of very important things while I was making my own that I'm going to share. Ready?
 Here's what you need:
 Here's what you need:
- twill tape (I wanted 100% cotton by the yard, but couldn't find any, so I had to get 100% polyester in a package)
- Iron-On transfer paper made for computer printers (mine is by Tulip and came from the t-shirt decorating part of the craft store)
- A computer and printer
Here's what you do:
- Find the width of your twill tape, and figure out what length you'd like your labels to be.
- In whatever program you like to use best, you'll need to arrange how you want your label to look. I used my Print Shop program, but Word would work, too. Make a table using the length and width dimensions for your labels. Once you've got the table set up, fill it in with your label text/logo.
- Once you are happy with it (and checked for typos) print it out, following the directions on the package of your iron-on transfer paper. *IMPORTANT* If you want the label to look exactly like it does on your computer screen, you need to go to your printer settings and set it to print as a "mirror image" before you print. If you don't do this, everything will be backwards once you iron on the label.
- Once it's printed out - be careful! The ink never fully dried on my transfer paper and smeared when I touched it (and I didn't realize that until I'd smeared several!)
- Now, you need to cut apart each label image (be careful not to smudge)
- Once you've got your images cut out, you'll need to cut your twill tape to the correct length. Don't forget to leave enough to fold under on each end so you'll have a nice, finished look when your label is sewn on.

- Once you've got the individual labels cut from your twill tape, center your iron-on image on the tape and iron it on (follow package directions for this one)
- Voila! Cheap, custom sewing labels.

OK, here are a couple of helpful hints:
- I took the time to fold over each edge of my twill tape and iron it down, so I'd have labels that were totally ready to sew on. It was a complete waste of time because those little flaps were undone when I ironed-on my image. Don't waste your time, or do it after the image is ironed on!
- Remember to set your printer settings to "mirror image" before you print, or your text will read backwards on your finished label.
- If you are going to iron over the label when it's sewn on to something (or to iron the ends under), save the backer paper that you peeled off once the image was ironed on. Put that over the top of your label when you iron over it again and you'll prevent the iron from sticking to the image or mussing it up.
- If you don't want sew on labels, just iron those puppies right on to your finished product!
- The most time consuming part of this whole project was setting up the table so I could fill it in with my label info (and therefore print a sheet of labels in one shot). So, save often. It would stink to have that hard work go down in a blaze of glory!
Friday, August 21, 2009
Mommy Necklace
 I'm going to be the craft person for my MOPS group this year, so I've been hunting down ideas for crafts that are cheap, easy and fantastic! This is one of them. I've been wanting a Mommy necklace for awhile now, but have been way too cheap to buy one. So, I made it myself!
 It's made out of washers from the Home Depot (cool and cheap all wrapped into one) that I stamped with my girls names. I put them together with wire from my scrapbooking stash because I found the cute angel charm that I wanted to put with them. If I didn't want to use the charm, I probably would have just run the ball chain through the holes of the washers.
 Guess what the grandmas are going to get for Christmas?
Tuesday, August 18, 2009
Redesign - Hall Table
Another post with yucky photos. Yippee! I tried to get better photos, really I did. Three times I took photos and edited, and they were all about the same. This table is located in my hallway and there aren't any windows that are super close. Add that to the fact that we've got the typical, small hall light and sunscreens on our windows (which is an absolute necessity here) and you've got a recipe for poor photos (even with my big flash). Alas, I tried. You'll still get the idea, though!
So, I've been wanting to do small updates around here (though hubby and I differ on what would constitute "small"), so this is one of the simple updates I started with. This table gets largely ignored - because it's in the hall. What was on the table worked, but not well.
The before:

The after:

The after is just some small, simple changes. We've got tall ceilings here and there is a large barn star hanging above this table. So, the items that were on it before were a little small in scale for that large star (you can see part of the star in the last photo). This new grouping is much better in scale.
The only thing I didn't have in my house prior to this weekend was the lamp. Everything else came from somewhere within my house. That came from a model home sale I went to this weekend. I'd seen signs for them before, but had never stopped. I didn't know what I was missing! Anyway, the lamp I bought for the living room but didn't like it once I got it in there. It works great in the hallway, however! Since the lamp is so tall, I needed something tall to balance it out. So, down came the chicken from atop my laundry room cabinets. A small, gold photo frame from my bedroom and two hardcover books to elevate the other frame and I was done!
 The end result is much better and doesn't make the table look as if it were an afterthought. I've wanted to put a different piece of furniture in this niche for awhile (like maybe a small armoire), but I've not been able to find the right piece. I had it in my mind that this would make a cute potting bench for my garden. Now that I've updated the accessories on the table, I'm liking it so much more. If the table ends up sticking around, I think I might finally give it a new coat of paint.

(Want to know a little secret? There is no electrical outlet anywhere near this table, so the lamp is purely decorative. One day I'll get an electrician out here to fix that! In the meantime, the lamp will just have to look fabulous off) :)
So, I've been wanting to do small updates around here (though hubby and I differ on what would constitute "small"), so this is one of the simple updates I started with. This table gets largely ignored - because it's in the hall. What was on the table worked, but not well.
The before:

The after:

The after is just some small, simple changes. We've got tall ceilings here and there is a large barn star hanging above this table. So, the items that were on it before were a little small in scale for that large star (you can see part of the star in the last photo). This new grouping is much better in scale.
The only thing I didn't have in my house prior to this weekend was the lamp. Everything else came from somewhere within my house. That came from a model home sale I went to this weekend. I'd seen signs for them before, but had never stopped. I didn't know what I was missing! Anyway, the lamp I bought for the living room but didn't like it once I got it in there. It works great in the hallway, however! Since the lamp is so tall, I needed something tall to balance it out. So, down came the chicken from atop my laundry room cabinets. A small, gold photo frame from my bedroom and two hardcover books to elevate the other frame and I was done!
 The end result is much better and doesn't make the table look as if it were an afterthought. I've wanted to put a different piece of furniture in this niche for awhile (like maybe a small armoire), but I've not been able to find the right piece. I had it in my mind that this would make a cute potting bench for my garden. Now that I've updated the accessories on the table, I'm liking it so much more. If the table ends up sticking around, I think I might finally give it a new coat of paint.
(Want to know a little secret? There is no electrical outlet anywhere near this table, so the lamp is purely decorative. One day I'll get an electrician out here to fix that! In the meantime, the lamp will just have to look fabulous off) :)
Friday, August 14, 2009
Giveaway!

A while back I told you that I'd partnered with a couple of fantastic sites for giveaways, and the first one is here!
When Susana at Our Homeschool Fun contacted me and asked me if I'd sponsor a giveaway on her site, I was intrigued. I've been toying with the idea of homeschooling our girls for a couple of months now, so it was another push from the cosmos in that direction, it seemed. When I visited her site, I fell in love. First, she's got super adorable kiddos! Seriously, wait until you see the pictures of them. Cuteness overload. Second, the stuff she does with her kids looks like so much fun!
So, go pay her a visit and enter to win a chance to win an Owl print crayon wallet handmade by Moi! You can see all the contest details here. I just checked out the comments and got warm fuzzies. *Smooch* to all of you for the love!
I'm still weighing my options regarding schooling, but I'm now following her site because of all the super cute ideas she's got. I can't wait to try some of the crafts she's got. Her recipe for banana bars is something the girls and I are going to make this week. Yummy!

Wednesday, August 12, 2009
The Rock Star Cake!
 I'm big on tiered cakes. First, I like the way they look. Second, we always have a ton of people at birthday parties around here, so we need the cake! I just think that tiered cakes are more fun than a regular sheet cake.
 I'd never worked with fondant before and was a little nervous about it. See, I had this vision of Taylor's cake in my head and if the fondant part didn't turn out, I'd have to go to Plan B. I didn't have a Plan B! Luckily, it was incredibly easy to work with.
 I like the way fondant looks, but I'm no fan of the taste. I know there are versions out there that supposedly taste better (Satin Ice I've heard is good), but I love me some buttercream. Seriously, that's the best part of the cake! So, I frosted it with buttercream and then used the fondant for the decorations.
 It was a pretty simple cake to construct - fondant balls, fondant stars on wire and fondant ribbons. The top layer was a vanilla cake with cheesecake filling; the bottom was chocolate with a chocolate mousse filling. Yummy! I've got to work on my stacking skills - you can see a that it's a tad bit lopsided. Something to work on next time. It was still a cute cake!
Tuesday, August 11, 2009
How to Make Tissue Paper Pom Poms
 I'm always looking for inspiration for easy, cheap ways to decorate for parties (or for holidays). When I was on one of my many browsing trips at Michael's I saw this Martha Stewart Kit to make tissue paper pom poms. Cute idea, but the kit was $19.99! Say wha?! I love me some Martha, but she had to have been smoking some funny stuff when she came up with the price of that kit! So, if you love these and want to make some, save yourself the $20 smackers and read on!
What you'll need:
- a package of tissue paper
- tulle strips (pipe cleaners would work, too)
- something to hang the finished pom poms with (I used tulle, but curling ribbon or regular ribbon would work, too)
- a pair of scissors
I wanted to hang my pom poms from the chandelier above my dining room table, so I made mine half sized (I cut the sheets of tissue paper in half). If you want big, full pom poms, use the full sheet of tissue paper.
Here's what you do:
- Separate a handful of tissue paper sheets from the bunch (I used as many as 8 and as few as 5 in one pom pom. Use more if you want a dense, full pom pom, but don't go too crazy and use the full package for one!)
- Fold the tissue paper like an accordion. My folds were about 2 1/2 " wide.

- Keep folding in the same manner until you've folded all of the tissue paper. You should have something that looks like this:

- Now, you're going to take scissors and cut each edge. You can round the ends, or make it a point, whichever you prefer.

- Now, tie the folded tissue paper in the middle. You want it to be snug, but not too tight. It's harder to puff it out if it's tied really tight.


- Once it's tied, you're ready to poof! One piece at a time, separate the tissue paper from the bunch. You have go be gentle so it doesn't tear. Once you've got all the layers separated you'll have something that looks like this:

Tie a piece of ribbon or a tulle strip around the center tie and you're ready to hang them. The look so cute hanging from my chandelier that they are still there (and the party was over a week ago!). Take that, Martha! :)

Subscribe to:
Posts (Atom)


